Image Processing with Torchvision
Table of Contents
- Introduction
- Classification
- Classification + Localisation
- Object Detection
- Instance Segmentation
- Semantic Segmentation
- Summary
Introduction
This is a brief overview of the most common image-processing tasks that can be performed using the PyTorch Torchvision package. These tasks include image classification, localisation, object detection, instance segmentation, and semantic segmentation. Several models, such as ResNet-50, Faster R-CNN, and FCN, are used to demonstrate these tasks. The weights used in these models are the default weights available in Torchvision. The code examples in this overview are based on the examples provided in the PyTorch documentation and use Torchvision version 0.16.
Classification
Image classification assigns a single class to a whole image using a model trained with predefined classes. The model predicts the probability of all classes it has been trained on and classifies based on the highest probability (and/or on a minimum threshold).
The image of a cat shown is classified with a 51.9% probability of being a “tiger cat”. The other classes in the top five are tabby: 4.9%, Egyptian cat: 1.1%, Persian cat: 0.2%and Leonberg: 0.1%.
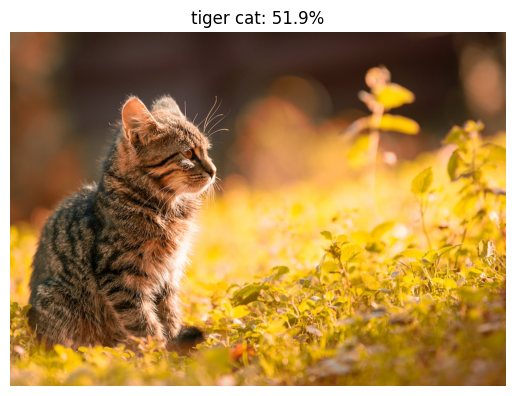 Image Classification Example
import matplotlib.pyplot as plt
from torchvision.io import read_image
from torchvision.models import resnet50, ResNet50_Weights
from torchvision import transforms

# Step 0: Load the image
img = read_image("pexels-septimiu-lupea-669015.jpg")

# Step 1: Initialize model with the best available weights
weights = ResNet50_Weights.DEFAULT
model = resnet50(weights=weights)
model.eval()

# Step 2: Initialize the inference transforms
preprocess = weights.transforms()

# Step 3: Apply inference preprocessing transforms
batch = preprocess(img).unsqueeze(0)

# Step 4: Use the model and print the predicted category
prediction = model(batch).squeeze(0).softmax(0)
class_id = prediction.argmax().item()
score = prediction[class_id].item()
category_name = weights.meta["categories"][class_id]

# Step 5: Display the image with predicted category
img = transforms.functional.to_pil_image(img)
plt.title(f"{category_name}: {100 * score:.1f}%")
plt.axis("off")
plt.imshow(img)
plt.show()

# Step 6: Print the top 5 categories
top5 = prediction.topk(5)
for score, class_id in zip(top5.values, top5.indices):
    category_name = weights.meta["categories"][class_id]
    print(f"{category_name}: {100 * score:.1f}%")
Image Classification + Localisation
Localisation extends image classification by locating the object in the image and drawing a bounding box around the object.
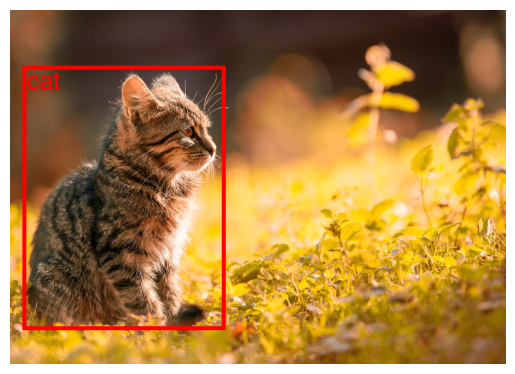 Image Localisation with Bounding Box
import matplotlib.pyplot as plt
from torchvision.io.image import read_image
from torchvision.models.detection import fasterrcnn_resnet50_fpn_v2, FasterRCNN_ResNet50_FPN_V2_Weights
from torchvision.utils import draw_bounding_boxes
from torchvision.transforms.functional import to_pil_image
# Step 0: Load the image
img = read_image("pexels-septimiu-lupea-669015.jpg")
# Step 1: Initialize model with the best available weights
weights = FasterRCNN_ResNet50_FPN_V2_Weights.DEFAULT
model = fasterrcnn_resnet50_fpn_v2(weights=weights, box_score_thresh=0.9)
model.eval()
# Step 2: Initialize the inference transforms
preprocess = weights.transforms()
# Step 3: Apply inference preprocessing transforms
batch = [preprocess(img)]
# Step 4: Use the model and visualize the prediction
prediction = model(batch)[0]
labels = [weights.meta["categories"][i] for i in prediction["labels"]]
box = draw_bounding_boxes(img, boxes=prediction["boxes"],
labels=labels,
colors="red",
width=8, font_size=50, font="Helvetica")
im = to_pil_image(box.detach())
# Step 5: Show the prediction
plt.axis("off")
plt.imshow(im)
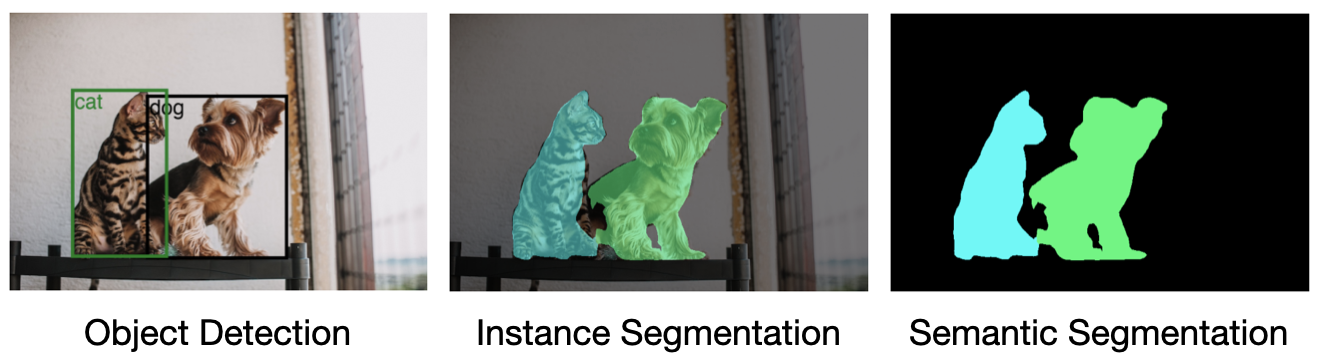
plt.show()Object Detection
Find multiple objects in an image and classify each object. In the example below, bounding boxes are drawn around each object.
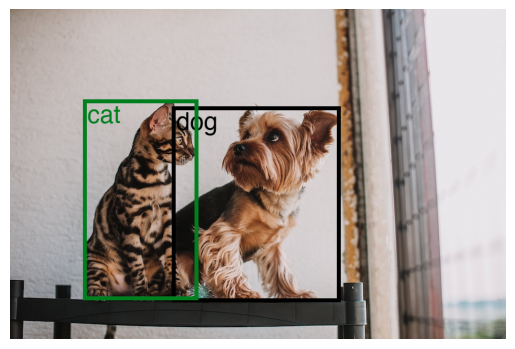 Object Detection Example
import matplotlib.pyplot as plt
from torchvision.io.image import read_image
from torchvision.models.detection import fasterrcnn_resnet50_fpn_v2, FasterRCNN_ResNet50_FPN_V2_Weights
from torchvision.utils import draw_bounding_boxes
from torchvision.transforms.functional import to_pil_image

# Step 0: Load the image
img = read_image("pexels-helena-jankovičová-kováčová-16395150.jpg")

# Step 1: Initialize model with the best available weights
weights = FasterRCNN_ResNet50_FPN_V2_Weights.DEFAULT
model = fasterrcnn_resnet50_fpn_v2(weights=weights, box_score_thresh=0.9)
model.eval()

# Step 2: Initialize the inference transforms
preprocess = weights.transforms()

# Step 3: Apply inference preprocessing transforms
batch = [preprocess(img)]

# Step 4: Use the model and visualize the prediction
prediction = model(batch)[0]
labels = [weights.meta["categories"][i] for i in prediction["labels"]]
box = draw_bounding_boxes(img, boxes=prediction["boxes"],
                          labels=labels,
                          width=8, font_size=50, font="Helvetica")
im = to_pil_image(box.detach())

# Step 5: Show the prediction
plt.axis("off")
plt.imshow(im)
plt.show()
Instance Segmentation
Instance segmentation extends beyond object detection with bounding boxes and outlines the boundary of the object pixel by pixel. This is useful in image editing or enhancement, where you want to cut or apply a filter to a particular object in the image.
 Instance Segmentation Example
import torch
import matplotlib.pyplot as plt
import torchvision.transforms as T
from torchvision.io.image import read_image
from torchvision.models.segmentation import fcn_resnet50, FCN_ResNet50_Weights
from torchvision.transforms.functional import to_pil_image
from torchvision.utils import draw_segmentation_masks

# Step 0: Load the image
img = read_image("pexels-helena-jankovičová-kováčová-16395150.jpg")

# Step 1: Initialize model with the best available weights
weights = FCN_ResNet50_Weights.DEFAULT
model = fcn_resnet50(weights=weights, progress=False)
model = model.eval()

# Step 2: Initialize the inference transforms
preprocess = weights.transforms()

# Step 3: Apply inference preprocessing transforms
batch = preprocess(img).unsqueeze(0)

# Step 4: Use the model for inference
prediction = model(batch)['out']

# Step 5: Normalize the prediction
normalized_masks = torch.nn.functional.softmax(prediction, dim=1)

# Step 6: Get the masks for all classes
num_classes = normalized_masks.shape[1]
masks = normalized_masks[0]
class_dim = 0
all_classes_masks = masks.argmax(class_dim) == torch.arange(num_classes)[:, None, None]

# Step 7: Resize the image to the size of the masks
transform = T.Resize((masks.shape[-2], masks.shape[-1]))
img = transform(img)

# Step 8: Draw the segmentation masks
all_masks = draw_segmentation_masks(img, masks=all_classes_masks, alpha=.5)

# Step 9: Convert the image to PIL and show it
plt.axis("off")
plt.imshow(to_pil_image(all_masks))
plt.show()
Semantic Segmentation
Semantic segmentation assigns a class to every pixel in the image. An example of this is for categorising land use in aerial images where the image would be assigned classes like building, water, forest, etc.
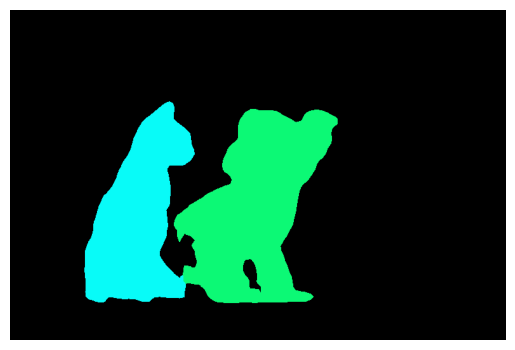 Semantic Segmentation Example
The example code segments are based on trained classes, so only the dog and cat are identified. Another example is generated using Meta AI’s Segment Anything, which better explains the concept of segmenting every pixel in the image.
 Segment Anything Example
import matplotlib.pyplot as plt
import torch
import numpy as np
from torchvision.io.image import read_image
from torchvision.models.segmentation import fcn_resnet50, FCN_ResNet50_Weights
from torchvision.transforms.functional import to_pil_image
from torchvision.utils import draw_segmentation_masks

# Step 0: Load the image
img = read_image("pexels-helena-jankovičová-kováčová-16395150.jpg")

# Step 1: Initialize model with the best available weights
weights = FCN_ResNet50_Weights.DEFAULT
model = fcn_resnet50(weights=weights)
model.eval()

# Step 2: Initialize the inference transforms
preprocess = weights.transforms()
#preprocess = weights.transforms(resize_size=None)

# Step 3: Apply inference preprocessing transforms
batch = preprocess(img).unsqueeze(0)

# Step 4: Use the model for inference
prediction = model(batch)["out"]
normalized_masks = prediction.softmax(dim=1)

# Step 6: Get the masks for all classes
num_classes = normalized_masks.shape[1]
masks = normalized_masks[0]
class_dim = 0
all_classes_masks = masks.argmax(class_dim) == torch.arange(num_classes)[:, None, None]

# Step 7: Create a background image to use in draw_segmentation_masks
channels = 3
height = masks.shape[-2]
width = masks.shape[-1]
bk_img = np.zeros([channels, height, width], dtype=np.uint8)
bk_img = torch.as_tensor(bk_img)

# Step 7: Draw the segmentation masks
all_masks = draw_segmentation_masks(bk_img, masks=all_classes_masks, alpha=1.0)

# Step 8: Show the segmented image and original
plt.axis("off")
plt.imshow(to_pil_image(all_masks))
plt.show()
plt.axis("off")
plt.imshow(to_pil_image(img))
plt.show()
Summary
In this post, we have explored various image-processing tasks and provided code examples using the Torchvision library. The classification and localisation examples were for a single class, while the object detection and segmentation examples were for multiple classes in a single image.
 Single Object
 Multiple Objects
References
The example images used in this post are from Pexels. Cat Photo by Helena Jankovičová Kováčová and Dog and Cat Photo by Septimiu Lupea.